14 Sept 2014

Passport photo ေလးေတြလုပ္ရေအာင္

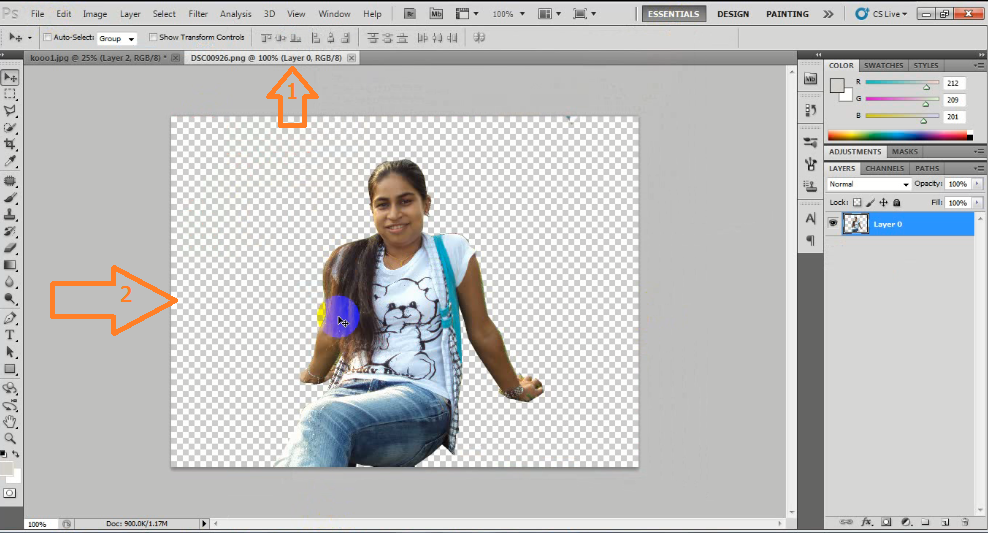
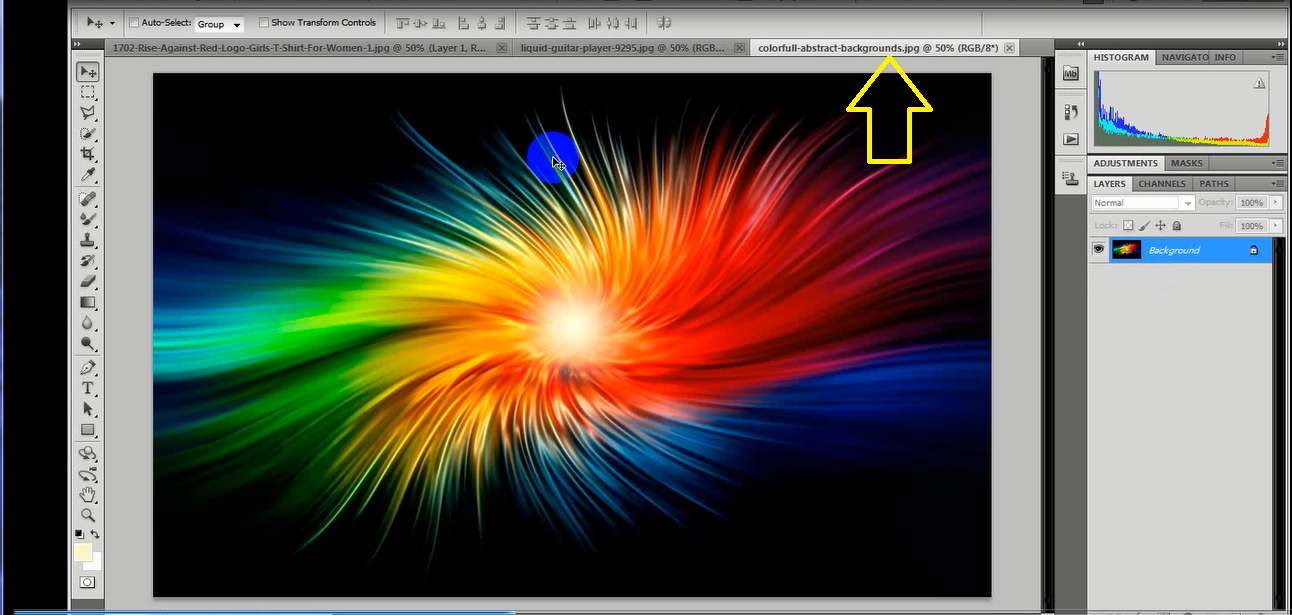
 ကဲကဲ အားလံုးမဂၤလာပါေနာ္ လာပါျပီ စိတ္ဝင္စားမယ္ ထင္လို႔ကၽြန္ေတာ္အတက္နိုင္ဆံုးနားလည္ရလြယ္ဆံုးေလးရွင္းျပေပးလိုက္ပါတယ္ ဒီပိုစ္ေလးေရးနိုင္ဖို႔ ကၽြန္ေတာ္ လေတာ္ေတာ္မ်ားမ်ား ေလးက်င့္ခဲ့ရပါတယ္ ဘာလို႔လဲဆိုေတာ့ကၽြန္ေတာ္မွာ အနီးကပ္သင္ေပးမယ့္ဆရာမရွိပါဘူး ေနာက္ကၽြန္ေတာ္လဲ သြားသင္ဖို႔အခ်ိန္မရွိပါဘူး အင္တာနတ္ေပၚကေန ဟိုနားတစ္စ ဒီနားတစ္စ နဲ႔ေပါ့ ခုေတာ့ရခဲ့ပါျပီ ကၽြန္ေတာ္မသိက် မေရရာေသးလို႔ မတင္းေသးတာလဲပါတယ္ ခိခိ ခုေတာ့အားလံုးေျပလည္ လက္ေတြ႔လုပ္ျပီးလို႔ ကၽြန္ေတာ္လို အခ်ိန္ကုန္ မသိေသးသူေတြမျဖစ္ေစလိုပါ အခ်ိန္ကအရမ္းတန္ဖိုးရွိပါတယ္ ဒါေၾကာင့္ တစ္ခါထဲ တစ္ေနရာထဲ တက္ေအာင္သိေအာင္ ေရးေပးလိုက္ပါတယ္ ကဲစိတ္ဝင္စားတဲ့ေဘာ္ေဘာ္ေတြ လိုက္လုပ္ၾကည့္ရေအာင္ေနာ္ ပထမအေနနဲ႔ ကိုဆီမွာရွိေနတဲ့ Adobe Photoshop ေလးဖြင့္လိုက္ပါေနာ္ သူငယ္ခ်င္းေတြက ဘာနဲ႔သံုးလဲေတာ့မသိဘူးေပါ့ ကၽြန္ေတာ္ကေတာ့ cs5 ပါ သိပ္ေတာ့မကြာပါဘူး လို႔ေတာ့ထင္ပါတယ္ စရေအာင္ေနာ္ ဖြင့္ျပီးရင္ ကိုယ္လုပ္မယ့္ပံုေလးကို file>open သြားေခၚပါေနာ္ (၂)မွာျပထားသလိုေလ.....


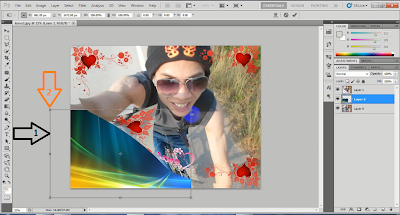
(၂)ေအာက(၁)ပံုမွာ ျပထားတဲ့ (၁)မွ်ားက tool ေလးနိုပ္ေပးလိုက္ပါ ပံုျဖက္မလို႔ပါေနာ္ ပံုျဖတ္တာေတာ့ tool ေတြရွိပါတယ္ အရင္ပိုစ့္ေတြမွာတစ္မ်ိဳးျဖတ္ျပေပးခဲ့ဖူးပါတယ္ ခုကေနာက္တစ္မ်ိဳးေပါ့ ျပီးရင္ ကိုလိုခ်င္တာက လူပံုဘဲမို႔ လူပံုေပၚမွာ လိုက္ကလစ္ေပးလိုက္ပါ လိုခင္တဲ့ေန႔ာေတြေလာက္ေပါ့ေနာ္ မ်ားသြားရင္ အေပၚဘားမွာ (+) ေလးနဲ႔ (-) ေလးေတြ႔မွာပါ (+)က ယူမယ့္ေနရာေတြစလပ္လိုက္ေပးရမွာပါ မ်ားသြားရင္ (-)ေလးကိုေမာက္နဲ႔ ကလစ္ျပီး ျပန္လုပ္လို႔ရပါတယ္ ကိုယ္သံုးေနတဲ့ tool အဝိုင္းက (+) ျဖစ္ေနရမွာပါ (-)ျပန္ျဖစ္ခ်င္ရင္ေတာ့ ကီးဘုပ္မွာနိုပ္ထားလဲရပါတယ္ (Alt)ေလးနိုပ္ၾကည့္ေပါ့ေနာ္ ေျပာျပတာပါ အဝိုင္းေလး ၾကီး ေသးခ်င္ရင္ ကီးဘုပ္မွ ( [ )  နဲ႔ ( ] ) ေလးကို နိုက္ၾကည့္ေနာ္ သိရပါ့မယ္ .... ကိုလိုခ်င္တဲ့ အတိုင္းအတာအထိရရင္ ပံုကိုေသသက္မႈရွိေအာင္ျပင္ရေအာင္ (၂)ပံုမွာျပထားသလို အေပၚဘားက Refine Edge ဆိုတာကလစ္ပါ ေဘာက္ေလးတက္လာမွာပါ .....


(၃) ကဲကၽြန္ေတာ္ေျပာသလို တက္လာပါျပီ (၁)ပံုမွာျပထားတဲ့မွ်ားေလးေတြၾကည့္ရေအာင္ အရင္(၁)မ်ွားေနရာေလးမွာ အမွန္ေလးေပးလိုက္ပါ (၂)မ်ွားေနရာကလစ္ျပီး က်န္ေနတဲ့ေနရာေတြလိုက္ျဖက္ေပးနိုင္ပါတယ္ နားမလည္ရင္ vdo ၾကည့္ရင္နားလည္သြားမွာပါ (၃)မွ်ားကေတာ့ အနားေတြ ေသတက္ေအာင္လိုက္ခ်ိန္ေပးရမွာပါ.. ကိုလိုခ်င္သေလာက္ရရင္ေတာ့ ok ေျဖေပးလိုက္ပါ....ျပီးရင္ copy လုပ္ရမွာပါ နားလည္ေအာင္ (၂) ပံုမွာျပထားပါတယ္ အလြယ္လုပ္ခ်င္ရင္ေတာ့ ကီးဘုပ္မွ (ctrl+c)တြဲကလစ္လဲရပါတယ္...


(၄) မွာဆက္ၾကည့္ရေအာင္ေနာ္ ဖိုင္အသစ္လုပ္ရပါ့မယ္ အေနာက္ခံအတြက္ပါ လုပ္ဖို႔ file>new သြားပါျပီးရင္ေဘာက္တက္လာမွာေပါ့ (၂)ပံုကတိုင္းေလးပါ ၊ ျပီးရင္ကိုလိုခ်င္ဆိုက္ခ်ိန္ပါ ကၽြန္ေတာ္ကေတာ့ ၄.၆ နဲ႔ထုပ္လိုက္ပါတယ္ အေသးစိတ္ကိုေတာ့ပံုမွာၾကည့္ေပးပါေနာ္ ေရးေနရင္ရွည္ေနမွာဆိုးလို႔ပါ..ျပီးရင္ ok ....


(5)ေအာက္ကပံုကိုၾကည္ရေအာင္ဘာေတြလဲ ေနာက္ခံကအျဖဴေရာင္ျဖစ္ေနတယ္ ေျပာင္းရမွာေပါ့ ဒီေတာ့ (၁)မွ်ားမွာျပထားတဲ့ေနရာမွာအေရာင္ (၂) မ်ိဳးနဲ႔ နွစ္ထပ္ျဖစ္ေနတာေတြ႔ရမွာပါ အေပၚကအေရာင္ကိုကလစ္လိုက္ပါေဘာက္တက္လာမွာပါလိုေျပာင္းမယ့္အေရာင္ေရြးျပီး ok ေျဖလိုက္ပါေနာ္ ျပီးရင္ (၂)မွ်ားမွာျပထားတဲ့ tool က ေဆးဗုန္းပံုစံေလးေရြးေပးလိုက္ေနာ္ ျပီးရင္ (၃)မွ်ားကအျဖဴေရာင္ မ်က္ႏွာေပၚ ေမာက္နဲ႔ ကလစ္ေပးလိုက္ပါ အေရာင္ေျပာင္းသြားမွာပါ (၂) ပံုလိုေလး ျပီးရင္ခုဏက copy လုပ္ထားတဲ့ပံုကို ဒီေနရာမွာဘဲ paste လုပ္ေပးလိုက္ပါ (၂)ပံုမွာျပထားပါတယ္ အလြယ္နိုပ္ရင္ေတာ့ ကီးဘုပ္ေပၚက ctrl+v ကိုတြဲနိုပ္ေပးလိုက္ရင္ ေအာ္တိုေရာက္လာမွာပါ....


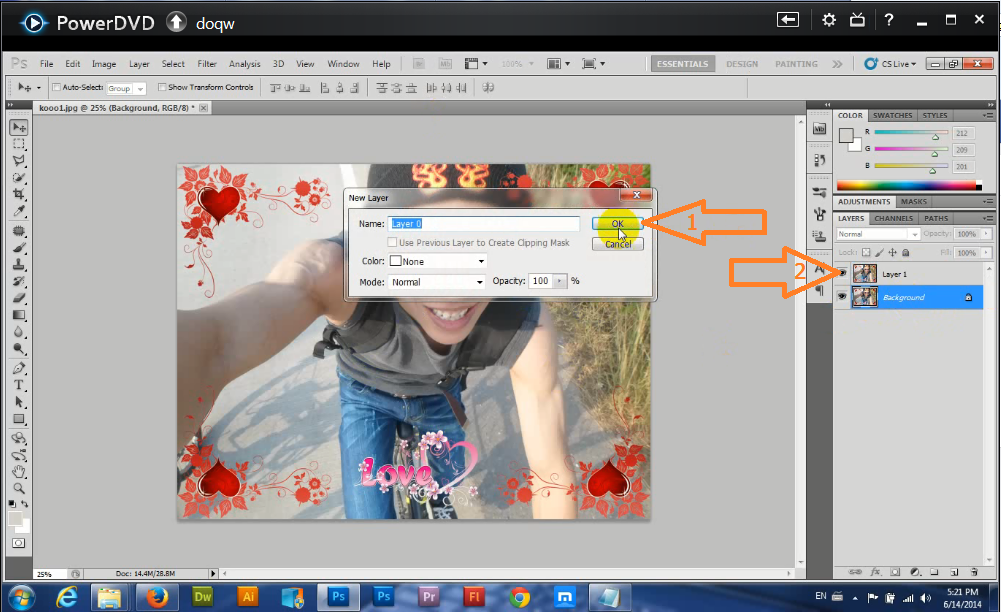
(၆)ေရာက္လာပါျပီ ေရာက္လာေတာ့ရုပ္ဆိုးေနတယ္ ေအာက္ပိုင္းျပတ္ေနတယ္ ေျပာမယ္ေပါ့ မသိတဲ့ညီငယ္ေတြက ေျပာလို႔ရပါတယ္ ဘာလို႔ေအာက္ပိုင္းမပါတာလဲဆိုေတာ့ကၽြန္ေတာ္သမင္ အေပၚပိုင္းဘဲယူမွာမို႔လို႔ အေပၚပိုင္းဘဲစလက္ေပးျပီယူခဲ့တာပါ ေအာက္မွာဆက္ၾကည့္လိုက္ရင္နားလည္သြားမွာပါ ေ၇ာက္လာရင္ အပံုေသးေနရင္ဘဲျဖစ္ျဖစ္ ၾကီးေနရင္လဲျဖသ္ျဖစ္ လိုခ်င္တဲ့ ပံုစံရဖို႔ခ်ိန္ေပးရမွာပါ ခ်ိန္ဖို႔အတြက္ ကီးဘုပ္ေပၚက ctrl+t ေလးကိုတြဲျပီးကလစ္လိုက္ပါ ၊ပံုမွာျပထားသလိုျဖစ္ေနမွာပါ၊ သတိ လူပံုဆိုက္မျပတ္ေအာင္ ေထာင့္တစ္ေနရာကေနေမာက္ေထာက္ျပီး ကီးဘုပ္ေပၚက shift နိုပ္ျပီး ေမာက္န႔ဲဆြဲေပးလိုက္ပါ လိုသေလာက္ရရင္ေတာ့ Enter ေခါက္ေပးလိုက္ပါ..(၂) ပံုေလးၾကည့္ပါပံုကိုလက္မပံု ျဖတ္ေတာ့မွာပါ ကၽြေတာ္ျဖတ္မွာ ၁ လက္မ ခြဲပါ အေပၚဘားက (width) မွာေလာေလာဆယ္ (1.6 in )ေလးနဲ႔ (Height)မွာေတာ့(2 in) လို႔ ခဏေပးထားလိုက္ပါ ၊ ျပီးရင္ ပံုေပၚေမာက္ေထာက္ျပီးလိုခ်င္သေလာက္ဆြဲလိုပါ ျပီးရင္ေမာက္လြက္လိုက္ပါ


(၇)  ေမာက္ေလးလြက္လိုက္တာနဲ႔ ေအာက္က(၁)ပံုေလးလိုျဖစ္ေနမွာပါေနာ္ ျပီးရင္ေမာက္ေလးေထာက္ျပီး
လိုက္ပါ စိတ္ၾကိုက္ရင္ေတာ့ (Enter) ေခါက္ေပးလိုက္ပါ(၂)ပံုလိုေတြ႔ရမွာပါ ျပီးရင္(၂)ပံုမွာျပထားသလို(၁)မွ်ားက ခဲျဖတ္ပံုစံ tool ေလးကလစ္ေပးပါဘာလို႔ကလစ္တာလဲကိုျဖက္လာတဲ့ပံုမွာအနာေတြအစြန္းေတြထြက္ေနရင္ျဖတ္ဖို႔ပါကိုယ္ပံုက
က ျဖက္စရာမလိုဘူးထင္ရင္ေတာ့နိုပ္စရာမလိုပါဘူးကၽြန္ေတာ္ကေတာ့နည္းနည္းေလး ေကာ္လံေလးေတြ အစထြက္ေနလို႔ ျဖက္တာပါ ျဖတ္ဖို႔ကေရြးရမွာပါ ေရြးဖို႔ (၂)မ်ွားမွာျပထားတဲ့ အေပၚဘားေထာင့္က ေအာက္စိုက္ေနတဲ့မ်ွားေသးေလးကိုနိုပ္လိုက္ရင္ (၃)မွွ်ားေလးလိုေပၚလာမွာပါ ေ၇ြးလိုက္ေပါ့ မမဲေရာင္အဝိုင္းၾကီးေတြက အတိအက်ျဖတ္ရတာ ေသးေသးေလးေတြက မထင့္သထင္ျဖတ္ရတာပါစမ္းၾကည့္ေပါ့ေနာ္..


(ဂ)ကဲခုမွအပံုကို ကိုယ္လိုခင္အတိအက်ျဖတ္ေတာ့မယ္ေနာ္ ကၽြနေတာ္ကေတာ့ ၁ လက္မျဖက္မွာပါ ေဘာ္ေဘာ္ေတြကကိုလိုခ်င္တဲ့ဆိုက္ကိုေရးပါေနာ္ ကၽြနေတာ္ ၁ လက္မ ျဖတ္တာလိုက္ၾကည့္လိုက္ပါေနာ္ အရင္ Image>image size ကိုသြားပါ ျပီးရင္ေဘာက္ေလးေပၚလာမွာပါ ကိုယ္လိုခ်င္တဲ့ ဆိုက္ ေရးရေတာ့မွာပါ ကၽြန္ေတာက ၁ လက္မ ဆိုေတာ့ width မွာ ၁.၁ လို႔ေရးထားပါတယ္ အမွန္ ၁ ဘဲေရးရမွာပါ ကၽြန္ေတာကဆိုင္ကလို အနားအကြစ္အတြက္ ပိုျဖတ္လိုက္တာပါ ဆက္ၾကည့္ရင္နားလည္သြားမွာပါ ေနာက္တစ္ခုက width တစ္တန္းထဲမွာဘဲ အေနာက္မွာ inches ျဖစ္ေနရမွာပါ ေအာက္ကဟာေတြကလိုက္လုပ္စရာမလိုပါဘူး width မွာေရးလိုက္တာနဲ႔ ေအာက္ကဟာေတြက ေအာ္တိုေျပာင္းေပးသြားမွာပါ မလုပ္တက္ လက္မမတြက္တက္တဲ့သူေတြအတြက္ပါ ဒါကေတာ့ကၽြန္ေတာ္တို႔ အတြက္နည္းလမ္းအေကာင္းဆံုးပါဘဲ၊
ကဲျပီးရင္ ok....


(9)ဒီအဆင့္က အနားကို ဆိုင္မွာလုပ္သလို ပံုေတြျဖတ္ရလြယ္ေအာင္အရင္ေပးတာလို႔လဲေျပာနိုင္ပါတယ္ ခုဏကအေပၚမွာ ၁ စိတ္ပိုလုပ္လဲ့တာ့ ခုေအာက္ကပံုေဘာင္အရာေပးဖို႕ပါ နားလည္တယ္ေနာ္ ၁ လက္မ ေရးရမယ့္ေနရာမွာ ကၽြနေတာ္က ၁.၁ ေရးခဲ့တယ္ေလ ပိုေနတဲ့ ၁ ကခုလုပ္မွာပါ စရေအာင္ အရင္ (၁)မွ်ားမွာျပထားတဲ့ tool ေလးကလစ္လိုက္ပါ ျပီးရင္အပံု အေပၚေထာင့္စြန္းကေနေအာက္ဆံုးထိဆြဲလိုက္ပါ ပံုပမာဏတိုင္းထိေပါ့ (၂)ပံုကတိုင္းအရာေလးေပၚေနတာေတြ႔ေနရမွာပါ ဆပ္ျပီး ပံုေပၚေမာက္ညာကလစ္ေလးနိုပ္လိုက္ပါ ေပၚလာတဲ့ စာေတြထဲက stroke ေလးနိုပ္ေပးလိုက္ပါ ေဘာက္ေလးတက္လာမွာပါ....


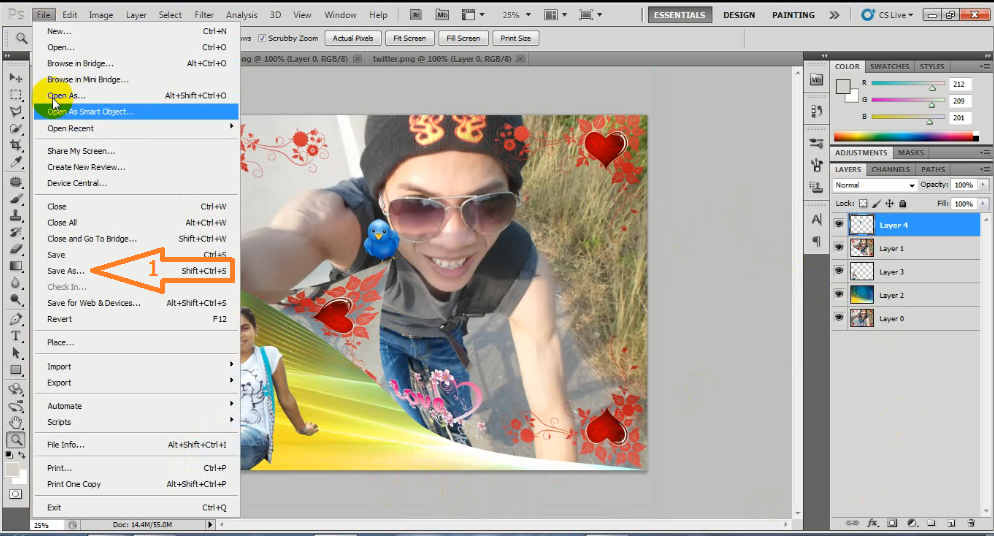
(၁၀)ေအာက္ကလိုေလး (၁)မွ်ားေနရာမွာ 11 px ေရးေပးထားပါ အေနေတာ္ေလးပါဘဲ ေသးခင္ရင္ေတာ့ေရွာ့လိုက္ေပ့ါေနာ္ အေရာင္ကေတာ့ ကိုယ္ၾကိုက္သလိုထားရပါတယ္ ဆိုင္ေတြမွာေတာ့ အျဖဴေရာင္ေလးထားပါတယ္ ကၽြန္ေတာ္က သူငယ္ခ်င္းေတြ ေတြေအာင္နားလည္ေအာင္ အနီေရာင္ေလးထားေပးထားတာပါေနာ္ ျပီးရင္ေတာ့ ok (၂)ပံုကလိုေလး ျပီးရင္ ခဏ save as ထားလိုက္ပါေနာ္ file> save as သြားျပီး


(၁၂)ေအာက္ကပံုၾကည္ျပီး save လုပ္လိုက္ေနာ္ တစ္ေနရာမွာေပါ့ ျပီးရင္(၂)ကလို  ျပန္ေခၚ လိုက္ပါ ခုဏကသိမ္းထားတဲ့ပံုေလး


(၁၃)ကဲေစာေစာအေရွ႔မွာ ၄. ၆ နဲ႔ new ဖိုင္ေလးရွိေနတယ္ေနာ္ မရွိလဲထပ္လုပ္လိုက္ေပါ့ေနာ္ ခိခိ ျပီးစာမ်က္နွာ ၂ ခုရွိေနမွာပါ အပံုရွိေနတဲ့စာမ်က္နွာမွာ (ctrl+a)အရင္နိုပ္ျပီး (ctrl+c)ေလးကိုတြဲနိုပ္ေပးလိုက္ပါေနာ္ ျပီးရင္
new ေဖာ္ဒါကိုသြားျပီ(ctrl+v)ေလးနိုပ္းလိုက္ရင္ျဖင့္ ေအာက္ကတိုင္းေပၚလာမွာပါ
 ျပီးရင္ေနရာခ်ေပးပါေထာင့္ေလးမွာ ျပီးတစ္ဆက္ထဲကီးဘုပ္ေပၚမွ(Alt)ေလးနိုပ္ပံုေပၚေမာက္ေထာက္ျပီးဆြဲ
လိုက္ပါ(၂)ပံုကလို ၂ ပံုျဖစ္သြားမွာပါ ...


(၁၄) ၂ပံုကို၄ျဖစ္ေအာင္လုပ္ဖို႔ အရင္ ကီးဘုပ္မွ (ctrl+e)ေလးတစ္ခ်တ္နိုပ္ေပးပါျပီးရင္ အေပၚကလိုဘဲ (Alt)ေလးနိုပ္ျပီးေမာက္ေထာက္ျပီးဆြဲလိုက္ပါ ၆.၄ မွာဆန္႔သေလာက္ သူတိုင္းလုပ္သြားလိုက္ပါ ဒီေလာက္ဆတုနားလည္ေလာက္ျပီထင္ပါတယ္ေနာ္ နားမလည္ေသးရင္လဲ (VDO) ေလးၾကည္ုလိုက္ေနာ္


 အားလံုးအဆင္ေျပပါေစဗ်ာ.....

RAR Password -  kooo

VDO HOWNLOAD HERE

ခုလိုအားေပးတဲ့အတြက္ အထူးေက်းဇဴးတင္ပါေၾကာင္း ေျပာၾကားပါရေစ..photoshow world မွ နည္းပညာမ်ားအား မည္သူမဆို လြတ္လပ္စြာ ကူးယူသုံးစြဲနိဳင္ပါတယ္.က်ြန္ေတာ္တင္သမွ်ပိုစ့္ေတြ Facebook ကေနရယူခ်င္တယ္ဆိုရင္ ဒီမွာ Like ႏွိပ္ပါ။ မန္ဘာ၀င္ခဲ့ျခင္းျဖင့္ ပိုစ့္အသစ္တင္တိုင္း မိမိ Gmail ထဲကိုတိုက္ရိုက္ေရာက္ရွိမည္ျဖစ္ပါသည္။ ထို႔ေၾကာင့္မန္ဘာ၀င္ခဲ့ဖို႔ဖိတ္ေခၚပါတယ္။

★★ Internet Download Manager 6.21 Build 10 Final + Crack ★★

IDM ကေတာ့  6.21 Build 10 ေလးထြက္လာျပန္ပါျပီ။ Full ျဖစ္ေစဖို႔အတြက္ Crack ဖိုင္ေလးနဲ႔တြဲေပး
ထားပါတယ္။အင္စေတာမလုပ္ခင္အရင္ရွိေနတဲ့အေဟာင္းကိုအရင္ထုတ္လိုက္ပါ။ျပီးရင္ေဆာ့စ္၀ဲကိုအင္စေတာ
လုပ္ပါ။ အင္စေတာလုပ္ျပီးတာနဲ႔ေပၚလာတဲ့ေဘာက္ေတြကိုအကုန္ပိတ္လိုက္ပါ။ျပီးရင္ Crack ဖိုင္ထဲမွာ
Crack.exe နဲ႔ေနာက္တစ္ခုတြဲေပးထားပါတယ္။Pest IDMen ဆိုတာကိုကလစ္လိုက္ပါ။ေဘာက္ေပၚလာရင္
Crack.exe ကိုဆြဲထည့္ေပးလိုက္ပါ။ျပီးရင္ Full အျဖစ္နဲ႔အသံုးျပဳႏိုင္ပါျပီ။အင္စေတာလုပ္နည္းကိုဖိုင္ထဲမွာ
အရင္ဖတ္ပါ။


Description:
Internet Download Manager 6.21 (IDM) is a reliabe and very useful tool with safe multipart downloading technology to accelerate from internet your downloads such a video, music, games, documents and other important stuff for you files. IDM has a smart download logic accelerator and increases download speeds by up to 5 times, resumes and schedules downloads. Comprehensive error recovery and resume capability will restart broken or interrupted downloads due to lost connections, network problems, computer shutdowns, or unexpected power outages. Simple graphic user interface makes Internet Download Manager user friendly and easy to use. Unlike other download managers and accelerators, IDM segments downloaded files dynamically during download process and reuses available connections without additional connect and login stages to achieve best acceleration performance.


Features:
• Internet Download Manager supports all popular browsers including Microsoft Internet Explorer, Netscape, MSN Explorer, AOL, Opera, Mozilla Firefox, Avant Browser, and it can be integrated into any Internet application to take over downloads using unique “Advanced Browser Integration” feature.
• Dynamic Segmentation and Performance.
• Easy downloading with one click. When you click on a download link in a browser, IDM will take over the download and accelerate it. IDM supports HTTP, FTP, HTTPS and MMS protocols.
• Download Speed Acceleration. IDM can accelerate downloads by up to 5 times due to its intelligent dynamic file segmentation technology.
• Download Resume. Internet Download Manager will resume unfinished download from the place where they left off.
• YouTube grabber. IDM can grab FLV videos from popular sites like YouTube, MySpaceTV, and Google Video.
• Drag and Drop. You may simply drag and drop links to IDM, and drag and drop downloaded files out of Internet Download Manager.
• Automatic Antivirus checking. Antivirus checking makes your downloads free from viruses and trojans.
• Advanced Browser Integration. When enabled, the feature can be used to catch any download from any application.
• Built-in Scheduler. IDM can connect to the Internet at a set time, download the files you want, disconnect, or shut down your computer when it’s done.
• IDM includes web site spider and grabber. IDM downloads all required files that are specified with filters from web sites, for example all pictures from a web site, or subsets of web sites, or complete web sites for offline browsing. It’s possible to schedule multiple grabber projects to run them once at a specified time, stop them at a specified time, or run periodically to synchronize changes.
• IDM supports many types of proxy servers. For example, IDM works with Microsoft ISA, and FTP proxy servers.
• IDM supports main authentication protocols: Basic, Negotiate, NTLM, and Keberos. Thus IDM can access many Internet and proxy servers using login name and password.
• Download All feature. IDM can add all downloads linked to the current page. It’s easy to download multiple files with this feature.
• Download Categories. IDM can be used to organize downloads automatically using defined download categories.
• Download limits. Progressive downloading with quotas feature. The feature is useful for connections that use some kind of fair access policy (or FAP) like Direcway, Direct PC, Hughes, etc.
• Internet Download Manager is multilingual.


Requirements:
OS: Windows All


What's New in This Release?
* Improved “IDM Integration module” Chrome extension

HomePage - http://www.internetdownloadmanager.com


Install Notes:
==> Read How to Install.txt


က်ြန္ေတာ္တင္သမွ်ပိုစ့္ေတြ Facebook ကေနရယူခ်င္တယ္ဆိုရင္  ဒီမွာ Like ႏွိပ္ပါ။
မန္ဘာ၀င္ခဲ့ျခင္းျဖင့္ ပိုစ့္အသစ္တင္တိုင္း မိမိ Gmail ထဲကိုတိုက္ရိုက္ေရာက္ရွိမည္ျဖစ္ပါသည္။
ထို႔ေၾကာင့္မန္ဘာ၀င္ခဲ့ဖို႔ဖိတ္ေခၚပါတယ္။


Thank You For Downloading And Dont Forget to Clicking Once on a Ad Banner.
အဆင္ေျပတယ္္ဆိုရင္ေတာ့ေၾကာ္ျငာမ်ားကို  ကလစ္ခဲ့ပါခင္ဗ်ာ။


★★နည္းပညာၿမိဳ႕ေတာ္★★


Android ထဲမွာ ဘယ္သူမွ မၾကည့္ရေအာင္ပိတ္ထားမယ္-Lockdown Pro Premium App Lock v1.3.1 Apk

ဒီေကာင္ေလးကေတာ့Android ထဲမွာ ဘယ္သူမွာ မၾကည့္ရပိတ္ထားေပးမယ္Lockdown apkေလးျဖစ္ပါ တယ္။ ဟုိတုန္ကတင္ေပးခဲ့ေသာVersionကိုျဖဳတ္ေပးမွာ အခု(Now)Updateေလးကိုထည့္ေပးရမွာျဖစ္ပါ တယ္ဗ်ာ။Lockdown apkေလးကေတာ့မိမိဖုန္းမွာ SMS, Gmail, Facebook, Whatsapp, SnapChat, Instagram, Viber, Line, ေတြအျပင္အျခားေသာ App ေတြကိုကိုယ္မသိပဲဖြင့္ၾကည့္မရေအာင္ Pattern Lock, Classic Lock & Calculator Lock စသည့္ 3 မ်ိဳးထဲကကေနမိမိၾကိဳက္ရာနဲ႔ေရြးျပီး lock ခ်ထားလို႔ရတဲ့ App ေလးပါ။ကိုယ္မသိပဲ ဖုန္းကို ဖြင့္လိုက္တာနဲ႔ ဘာနဲ႔ဖြင့္မလည္းဆိုတာ ပံုမွာျပထားတဲ့အတိုင္းေမးပါမယ္။ ကိုယ္မသိတဲ့လူက၀င္ေရာက္ကိုင္တြယ္အသံုးျပဳပါ lockကိုမျဖည္ႏိုင္လွ်င္ ဓါတ္ပံုရိုက္ထားေပးမွာျဖစ္ပါတယ္။Android : 2.2 ႏွင့္အထက္ကစျပီးအသံုးျပဳႏိုင္ပါတယ္။
Lockdown Pro Premium App Lock Apk - is a wonderful app lock application for Android users. Lockdown Pro is the best app lock and privacy protect tool. It can lock any app such as SMS, Gmail, Facebook, WhatsApp, SnapChat, Instagram, Viber etc Key Features:-
  •     1Tap to lock apps
  •     Auto lock new install app
  •     Show fake cover
  •     Lockscreen. This feature will replace your default lock screen
  •     Taking pictures after wrong password
  •     Auto uploading pictures to Google Drive
  •     Auto send email with some info and pictures of the person whop wants to access your phone
  •     Auto lock and unlock when you get in and out your setting locations
  •     Active lock apps with a SMS
  •     Three password modes as pattern lock, classic lock and calculator lock
  •     Fake error message
  •     Time pin password
  •     Themes store
  •     Screen timeout. The screen will never turn off when running registered app
  •     Random keyboard password
  •     Prevent uninstall lockdown pro and clear the memory on some devices
  •     Lock  device administrator
ဝင္းလႈိင္(နည္းပညာ)

ေမတၱာရပ္ခံခ်က္=ဝက္ဆိုဒ္ေပၚတြင္ရိွသည့္ ေၾကာ္ျငာတစ္ခု ကလစ္ေပးခဲ့ပါေနာ္

မိမိဓါတ္ပံုေလးကို အနားေထာင့္ေလးမွာေကာ္လံစတိုင္ဒီဇိုင္းေလးလုပ္နည္း

မဂၤလာပါ ကၽြန္ေတာ္ဒီေန႔ photoshow နည္းလမ္း မိမိဓါတ္ပံုေလးကို အနားေထာင့္ေလးမွာေကာ္လံစတိုင္ဒီဇိုင္းေလးလုပ္နည္း တင္ေပးလိုက္ပါတယ္..ခုမွေလ့လာေနသူ photoshopw ကို ဝါဒနာပါေသာ ေဘာ္ေဘာ္ေတြ အတြက္ တစ္ေနရာမွာအသုံးဝင္မယ္ထင္လို႔ နည္းလမ္းေလးေပးလိုက္ပါတယ္ သိထားတက္ထားတဲ့ေဘာ္ေဘာ္ေတြေတာ့ေက်ာ္သြားပါေနာ္ ကၽြန္ေတာ္ေလ့လာပိုစ့္ခ်ရင္မိုလို႔ အမွားေလးမ်ားပါခဲ့ရင္ သိခံေပးၾကပါ သိထားတဲ့ ဆရာမ်ားကေတာ့ အမွားေလးမ်ားပ့ရင္ ေထာက္ျပေပးပါ ဒီငမိုက္သားေလးကိုေပါ့..ကဲစကားေတာ့မ်ားျပီးသြားျပီဆိုေတာ့ လုပ္ငန္းေလးစလိုက္ၾကရေအာင္ေနာ္....ေအာက္ကပံုေလးတိုင္း photoshow ဖြင္ျပီး လုပ္ခ်င္တဲ့ပံုေလး ဆြဲထည့္လိုက္ပါ ။ 
မ်ွားျပထားတာၾကည္ပါ ေသာ့ေလးေတြ႔ေနရမွာပါ....
၂။ မွာေတာ့ ေသာ့ရွိေနတဲ့ ေနရာေလးကို left ကလစ္ေလး ကလစ္းေပးလိုက္ရင္ဘဲ ေဘာက္ေလးတစ္ခုတက္လာမွာပါ၊ တက္လာရင္ ok ေျဖေပးလိုက္ေပါ့ ဒါဆိုေျပာက္သြားပါလိပ္မယ္ ၊ ေနာက္(၂)မ်ွားမွာျပထားသလို မြားလိုက္ရမွာပါ အျပာေရာင္ေပးထားတာက ပထမ ပံုပါ ပထမပံုကိုေထာက္ျပီး ctrl+j ကိုတဲြ နိုပ္လိုက္ရင္ဘဲ ပံုမွာျပထားသလို (၂)ခုေတြ႔ရမွာပါေနာ္...
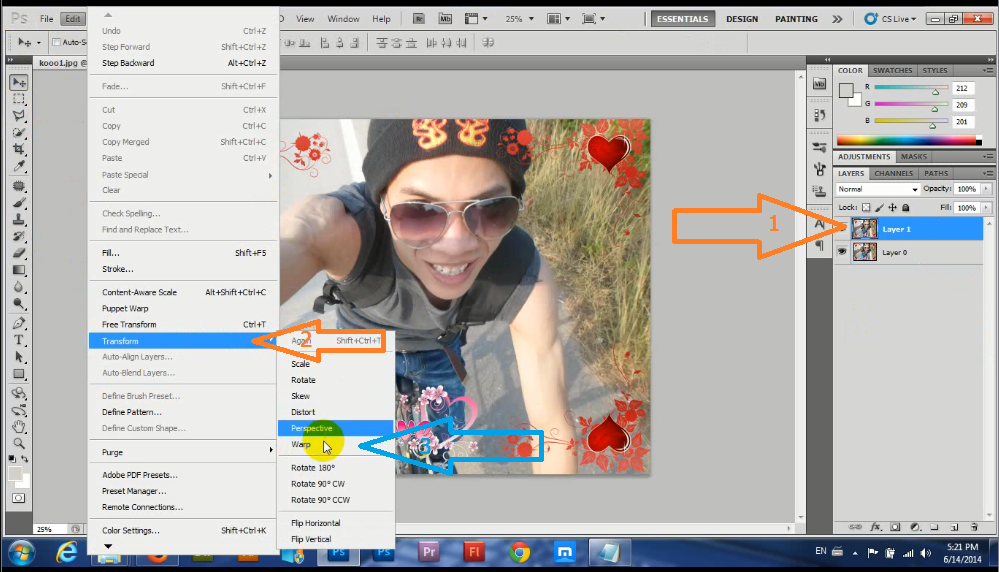
၃။ေအာက္မွာျပထားတာကေတာ့ မြားထားတဲ့ပံုကိုေမာက္ေထာက္ျပီး ျပာေပးထားပါ ျပီးရင္ edit ကိုသြားျပီး (၁)မ်ွား (၂)မ်ွား ျပထားသလို အဆင့္လိုက္ဝင္သြားပါ၊

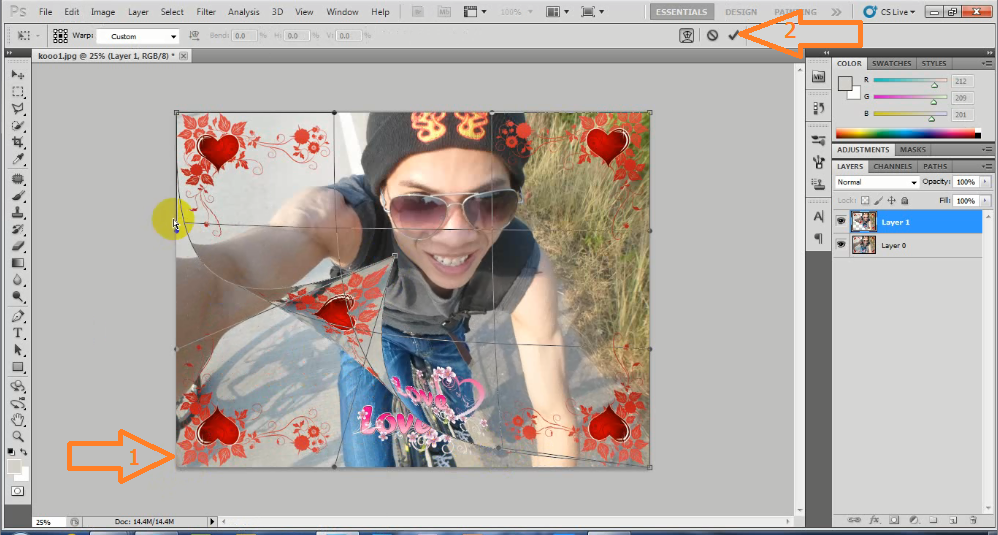
၄။အပၚမွာေျပာခဲ့သလို ဝင္လိုက္ရင္ဘဲ warp ေလးနိုပ္လိုက္ရင္ဘဲ ေအာက္မွာျပထားသလို ပံုေပၚမွာက်ားကြပ္ပံုစံ ေလးနဲ႔ အကြပ္ေပၚေနမွာပါ၊ (၁)မ်ွားမွာျပထားတာက ေထာင့္စြန္းကေနကိုလိုခ်င္တဲ့ပံုစံထိ အေပၚကိုဆြဲရမွာပါ ၊ ျပီးရင္ (၂) မ်ွားျပထားတဲ့ အမွတ္ကိုနိုပ္လိုက္ပါ ၊ ဒါဆိုတစ္ဆင့္ျပီးပါျပီ။

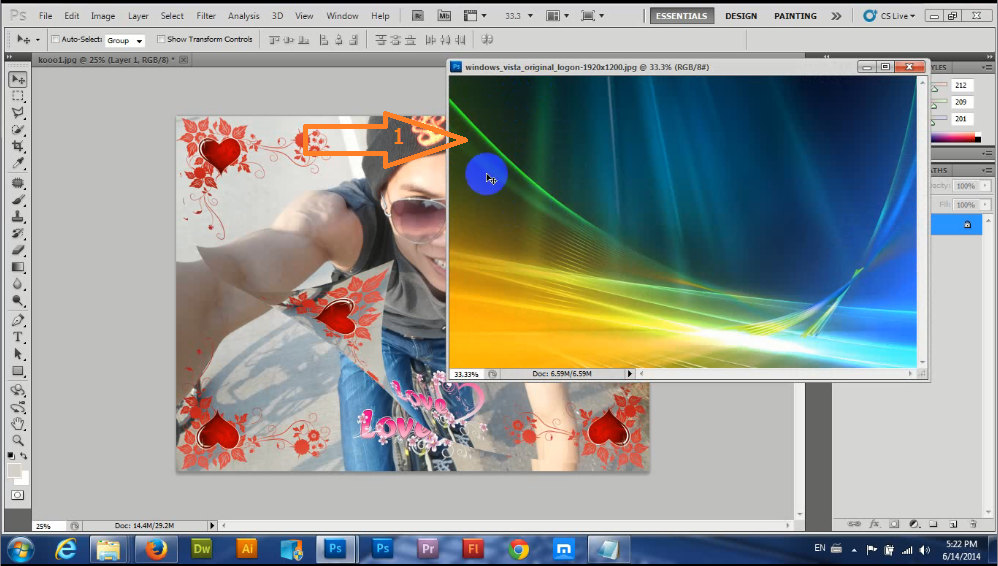
၅။ေအာက္ကပံုစံကေတာ့ ေနာက္ခံပံုထည့္ဖို႔ ကိုယ္ၾကိဳက္တဲ့ပံု ထပ္ေခၚလိုက္တာပါ ေနာက္ျပီး ပံုကိုေဘးပို႔ျပီး ပံုေပၚေမာက္ေထာက္ျပီး ပထမလုပ္ထားတဲ့ပံုထဲ ဆြဲထည့္လိုက္ပါ။
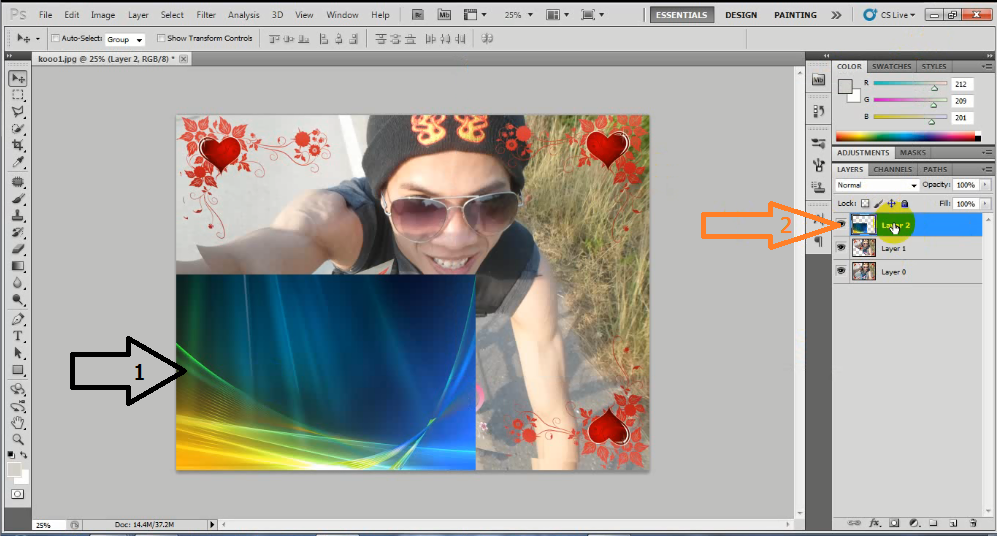
၆။ဒီမွာေတာ့ေတြ႔တဲ့တိုင္းဘဲ နားလည္မွာမဟုပ္ဘူး မပူနဲ႔ ဆက္ေျပာမယ္ (၁)မ်ွားျပထားတာက ဆြဲထည့္တဲ့ ပံုကိုေနရာခ်မလို႔ခ်ိန္ေနတာ ပထမပံုကိုအုပ္မိုးေနတာေတြေနရတယ္မွတ္လား ထားခ်င္တာက ပံုေအာက္မွာမွတ္လား (၂)မ်ွားမွာျပထားတာက ဆြဲထည့္ထားတဲ့ပံုရွိေနတဲ့ေနရာ ေပါ့ (၂)မ်ွားကပံုကိုေမာက္ေထာက္ေထာက္ျပီး ဒုတိယေနရာကိုဆြဲလိုက္.....
၇။ေအာက္ကပံုမွာေတြ႔လားဒုတိယေနရာေရာက္သြားျပီ ဒါဆိုရျပီ မျပီးေသးပါဘူး (၂)မ်ွားျပထားတာက အပံုေသးေနလို႔ အၾကီးခ်ဲ႕မွာပါ ကိုလိုခ်င္တဲ့ပံုခ်ဲဖို႔ ပံုရွိေနတဲ့ေနရာကို ျပညေပးထားရမွာပါ အပံုကိုေသခ်ာၾကည့္ပါ ၊ေနာက္ ကီးဘုက္ေပၚက ctrl+t ကိုတြဲနိုပ္ပါ၊ နိုပ္လိုက္ရင္ဘဲ (၁)မ်ွားျပထားသလိုအပံုမွာ အကြပ္ေလးေပၚလာမွာပါ ျပီးရင္ (၂)မ်ွားလားသလိုေထာင့္ကေန ေမာက္နဲ႔ဆြဲလိုက္ပါ ကိုယ္လိုသေလာက္ေပါ့ ၊ သတိ..လူပံုဆိုရင္ ကီးဘုက္ေပၚမွ shist ကီးကိုနိုပ္ျပီးဆြဲရပါ့မယ္ ဘာျဖစ္လို႔လဲဆိုေတာ့ အပံုျပတ္မွာဆိုးလို႔ပါ ေနာက္လုပ္ရင္းနဲ႔သေဘာေပါက္နားလည္လာမွာပါ....
၈။ဒါကေတာ့ခုန ကေနာက္ခံပံုေပၚမွာထားမယ္ အပံုပါ မိတ္ေဆြတို႔ကေတာ့ ကိုယ္ထည့္ခ်င္တဲ့ ပံုထည့္ပါ ခုဆြဲထည့္ထားတဲ့ပံုကျဖတ္ျပီးသားပါေနာ္ (၁)မ်ွားျပထားတာကပံုရွိေနတဲ့ဘားပါ (၂)မ်ွားျပထားတာက ကီဘုပ္ေပၚမွ ctrl+a နိုပ္ရင္ေပၚလာမယ့္အကြက္ေလးပါ။ ျပီးေနာက္တျပိဳင္ထဲ ctrl+c တြဲနိုပ္ပါ 
မွတ္ခ်က္..ctrl+a=all
             ctrl+c=copy
            ctrl+v=paste
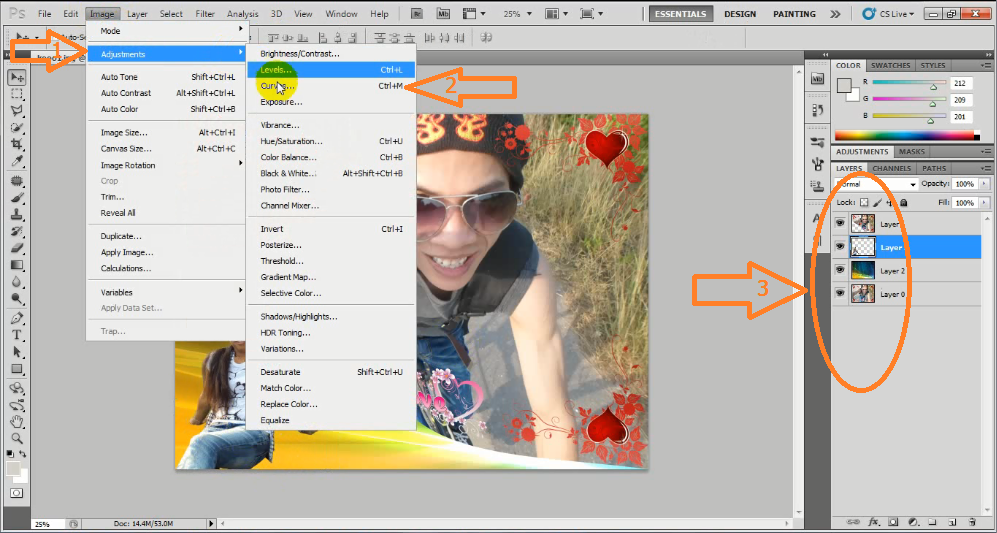
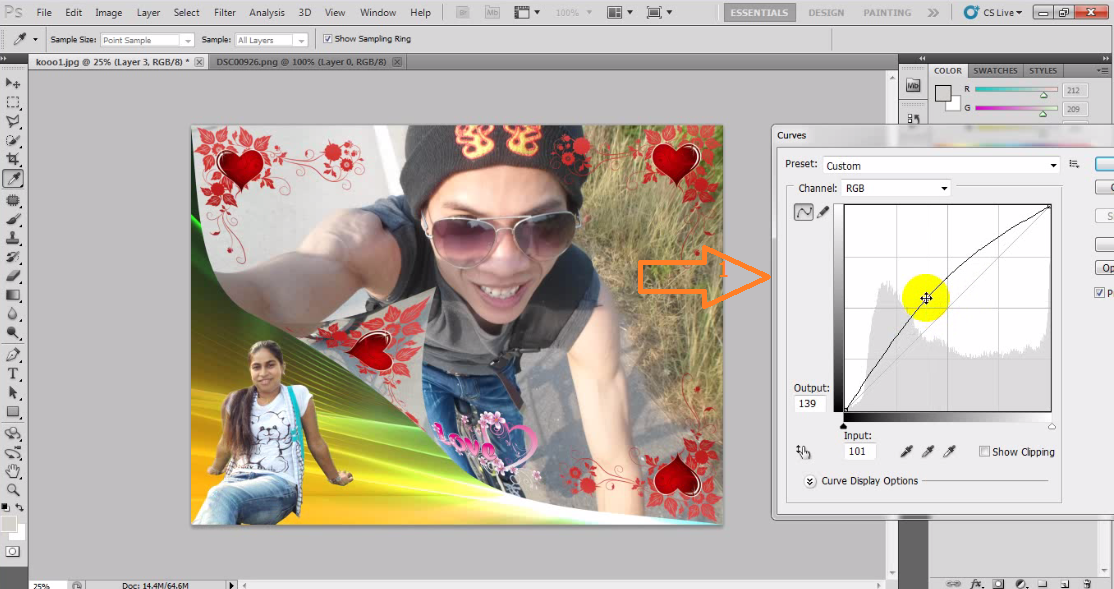
၉။မွာေတာ့ခုနက အေပၚမွာ copy လုပ္ထားတာကို paste လုပ္ထည့္လိုက္ပါျပီ ျပီးရင္ (ရ)ေျပာခဲ့သလိုပါဘဲ အပံုကိုလိုခ်င္သလို လုပ္ယူပါ။ ျပီးရင္ေတာ့ ေမွာင္ေနတဲ့ပံုေတြကို တစ္ခုခ်င္းဆီ အေ၇ာင္တင္မယ္ေနာ္ (၁)မ်ွား(၂)မ်ွားျပလားသလိုတစ္ဆင့္စီဝင္သြားပါ curves ကိုကလစ္ရင္ဘဲေဘာက္တစ္ခုတက္လာမွာပါ(၂)ပံုေျမာက္မွာမ်ွားျပထားတဲ့ေဘာက္ေလးေပါ့ အေရာင္ (၄၀မ်ိဳးရွိပါတယ္ ေရြးလုပ္နိုင္ပါတယ္
(၃)မ်ွားမွာျပျပီးဝိုင္းထားတာက အေရာင္တင္ခ်င္တာကိုတစ္ခုခ်င္းေရြးျပီးတင္ပါ


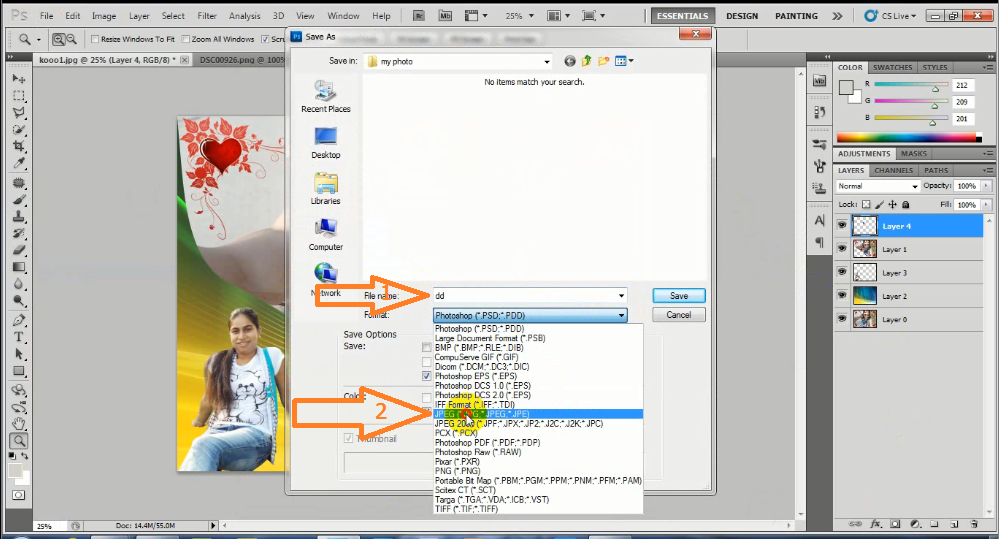
၁၀။ဒီမွာေတာ့အားလံုျပီးသြားလို႔ ပံုကိုသိမ္းမွာပါ သိမ္းဖို႔အတြက္ file >save as နိုပ္ရင္ဘဲ ေဘာက္တစ္ခုတက္လာမွာပါ ၊ ဒုတိယပံုျပထားသလိုေပါ့ ျပီးရင္(၁)မ်ွားျပထားတာကေနမည္ေပးမယ္ေနရာ (၂)မ်ွားျပထားတာက jpeg နဲ႔ သိမ္းရပါမယ္ jpeg 2 ရွိပါတယ္ မ်ွာျပထားတဲ့ အေပၚက jpeg ပါေနာ္...


ဒီေလာက္ဆိုနားလည္ေလာက္ပါျပီေနာ္ နားမလည္ေသးရင္လဲ vdo ထပ္ၾကည့္ေပ့ါေနာ္ ကၽြန္ေတာ္ေလ့လာသလိုဘဲ အေသးစိတ္တက္နိုင္သေလာက္တင္ေပးလိုက္တာပါ မွားတာေလးေတြပါရင္လဲနားလာ္ေပးပါလို႔ထပ္ေျပာလိုက္ပါရေစ၊ ေနာက္လဲတက္နိုင္သေလာက္ ပိို႔စ္ေတြတင္ေပးသြားပါမယ္။


ခုလိုအားေပးတဲ့အတြက္ အထူးေက်းဇဴးတင္ပါေၾကာင္း ေျပာၾကားပါရေစ..photoshow worlsdမွ  နည္းပညာမ်ားအား မည္သူမဆို လြတ္လပ္စြာ ကူးယူသုံးစြဲနိဳင္ပါတယ္.က်ြန္ေတာ္တင္သမွ်ပိုစ့္ေတြ Facebook ကေနရယူခ်င္တယ္ဆိုရင္ ဒီမွာ Like ႏွိပ္ပါ။ မန္ဘာ၀င္ခဲ့ျခင္းျဖင့္ ပိုစ့္အသစ္တင္တိုင္း မိမိ Gmail ထဲကိုတိုက္ရိုက္ေရာက္ရွိမည္ျဖစ္ပါသည္။ 
ထို႔ေၾကာင့္မန္ဘာ၀င္ခဲ့ဖို႔ဖိတ္ေခၚပါတယ္။
အိကၤ် ီဒီဇိုင္းေလးလုပ္မယ္

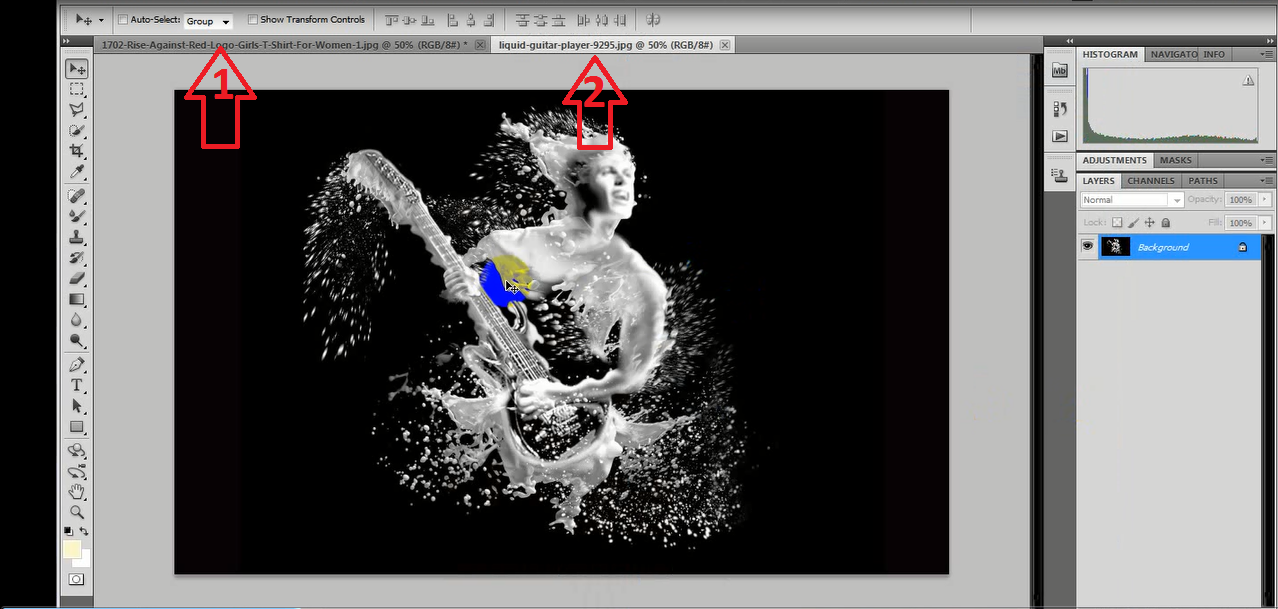
မဂၤလာပါေနာ္ ကၽြန္ေတာ္နဲ႔တူ မလုပ္တက္တဲ့ေဘာ္ေဘာ္မ်ားလိုက္လုပ္ၾကည့္ရေအာင္ေနာ္ ကၽြန္ေတာ္တက္နိုင္သေလာက္ အေကာင္းဆံုးျဖစ္ေအာင္ ပံုႏွင့္တကြ vdo ေလးပါတင္ေပးထားပါတယ္ လိုအပ္တဲ့ဒီဇိုင္းေလးေတြပါ စာအုပ္နဲ႔အတူ win rar နဲ႔တင္ေပးထားပါတယ္ ကဲလုပ္ကြက္ေလးေတြစမယ္ေနာ္ အရင္ကိုယ္လုပ္မယ့္ဒီဇိုင္းေတြကို တစ္ေနရာထဲစုထားေပါ့ Adobe Photoshop ေလးကိုဖြင့္ျပီး file>open ကိုသြားျပီးလုပ္ေဆာင္ရမယ့္အပံုေတြဖြင့္ေပါ့
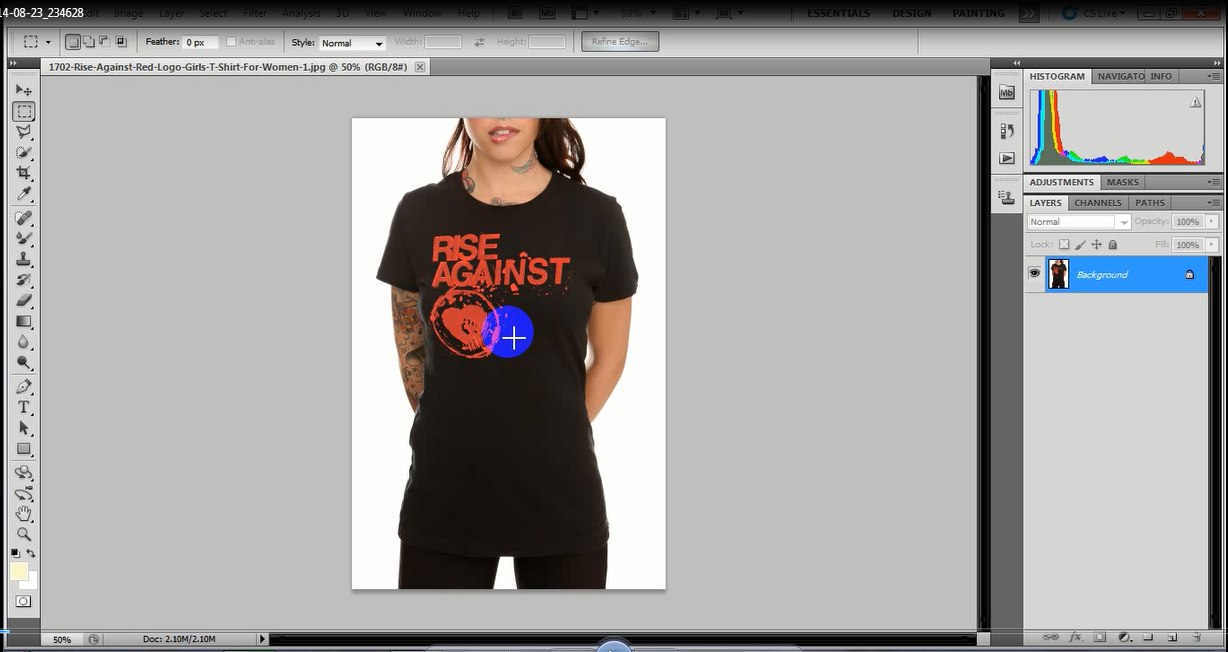
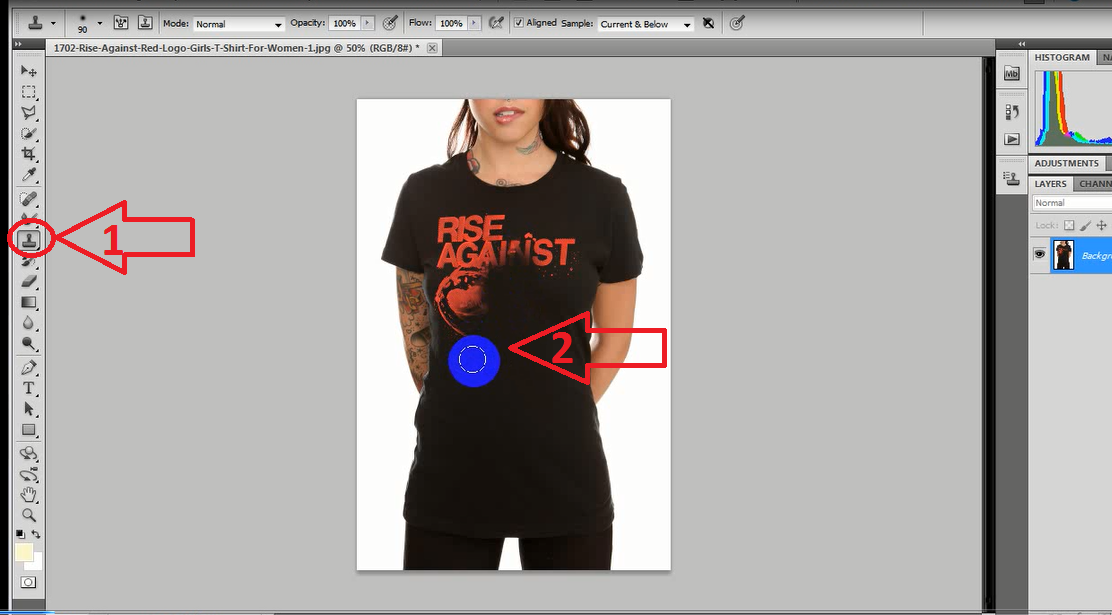
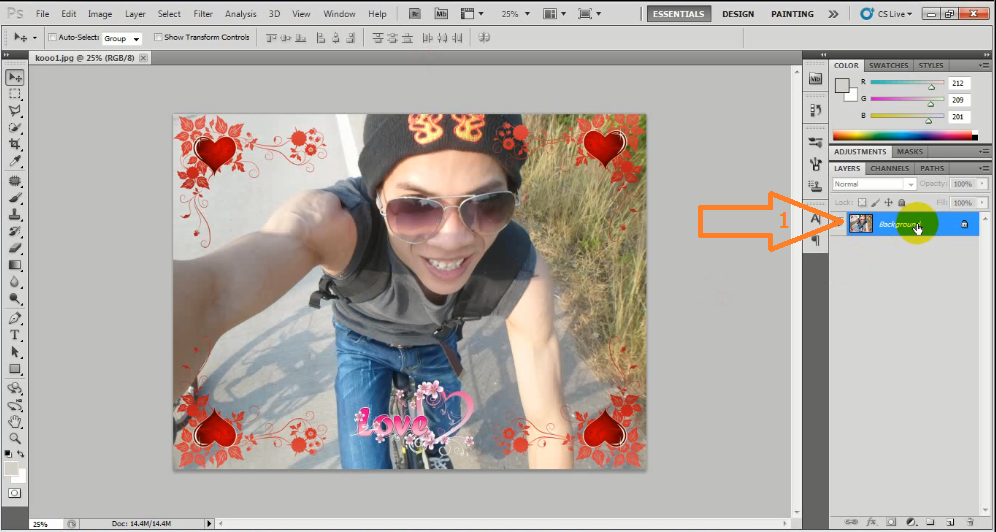
(၁)ေအာက္ကပံုမွာ ပထမပံုက လုပ္မယ့္အိကၤ် ီမွာမလိုခ်င္တာကိုျဖတ္ထုပ္မွာေပါ့ ဘာနဲ႔ျဖက္မွာလဲ ျဖက္နည္းေတြကအမ်ိဳးရွိပါတယ္ သူဟာနဲ႔သူ လိုက္ေအာင္ကိုယ့္ အိုင္ဒီရာ နဲ႔လုပ္ရမွာပါ ဒုတိယပံုက(၁)မ်ွားမွာျပထားတဲ့ clone stanp tool ေလးနဲ႔ျဖတ္ၾကည့္ရေအာင္ေနာ္ ျဖတ္မယ့္ မဝိုင္းေလးကို အၾကီးအေသးလုပ္ဖို႔ ကီးဘုပ္ေပၚက [ =] ေလးသံုးရမွာပါ = [ = ေလးကေသးေအာင္လုပ္တာပါ = ] =ေလးကၾကီးေအာင္လုပ္တာေပါ့ေနာ္ သတိေလးထားရမွာကအေရးၾကီးပါတယ္ ဘာလဲဆိုေတာ့ ျဖက္ေတာ့မယ္ဆို ကိုယ္အေရာင္တူေစခ်င္တဲ့ ေနရာမွာေမာက္အရင္ေထာက္ျပီး ကီးဘုပ္ေပၚက Alt ေလးပါနိုပ္ျပီးနည္းနည္း အလိုက္ဆြဲေပးလိုက္ပါ ေျပာမယ္ဆိုအေရာင္အစားထိုးတာပါ ေနာက္လုပ္ရင္းသိသြားမွာပါ နည္းနည္းစိတ္ရွည္ျပီးလုပ္ၾကည့္ေပးပါ photoshow လုပ္ရင္ေတာ့ စိတ္ရွည္ရမယ္ အိုင္ဒီရာေကာင္းရမယ္ ဒါမွ စိတ္တိုင္းက် အပံုရမွာပါ
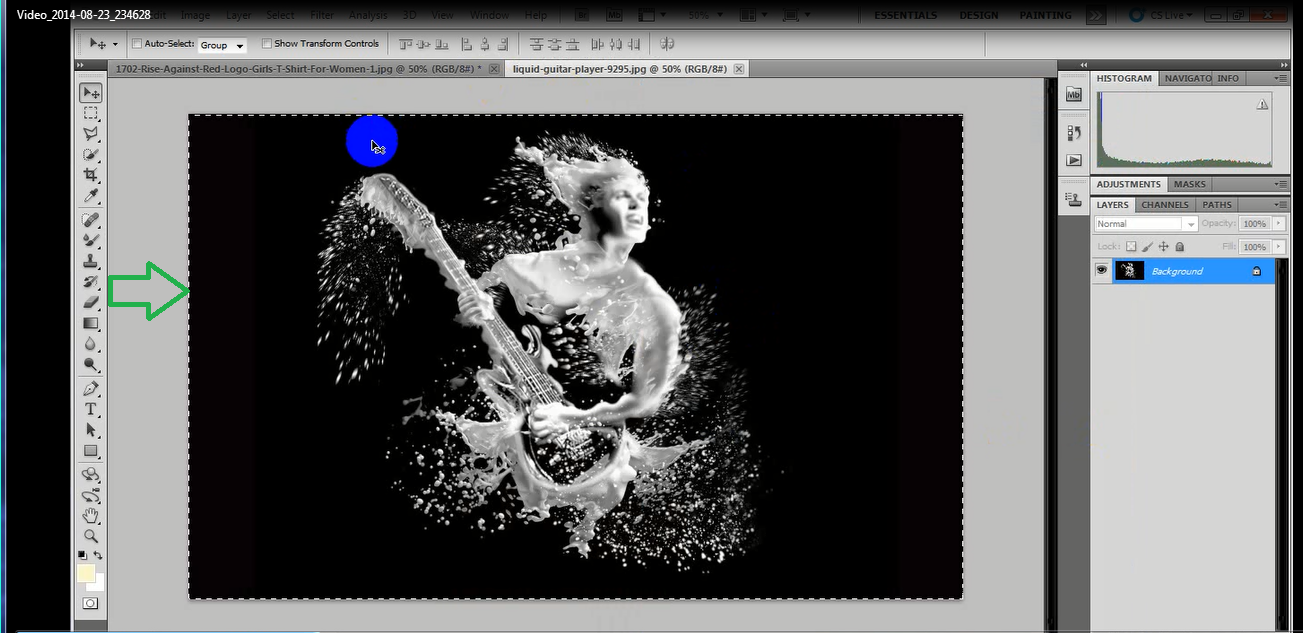
(၂)အေပၚကေျပာသလို ျဖတ္ျပီးရင္ ကိုစိတ္တိုင္းက်ရင္ေတာ့ ကိုယ္ထက္ထည့္မယ္ အပံုေလးကိုfile>open
သြားျပီးထပ္ထည့္ပါေနာ္ တစ္မွ်ားမွာျပထားတာက ခုဏ ကျဖတ္ထားတဲ့ပံုေလးပါ (၂)မ်ွားကေတာ့ခုလက္ရွိပံုေလးေပါ့ ဒီပံုေလးကို ခုဏ ကျဖတ္ထားတဲ့ေပၚတင္ဖို႔အတြက္ ကီးဘုပ္ေပၚမွာ ctrl+A နဲ႔နိုပ္လိုက္ပါ ဒါဆို ဒုတိယ ပံုေလးလို အကြပ္ေပၚလာရင္ေတာ့ copy လုပ္ဖို႔ ctrl+c ကိုနိုပ္ေပးလိုက္ပါ ျပီးရင္ေတာ့ (၁)မ်ွားေနရာနိုပ္ျပီး ပထမပံုေနရာမွာ ctrl+v ေလးနိုပ္ေပးလိုက္ပါ
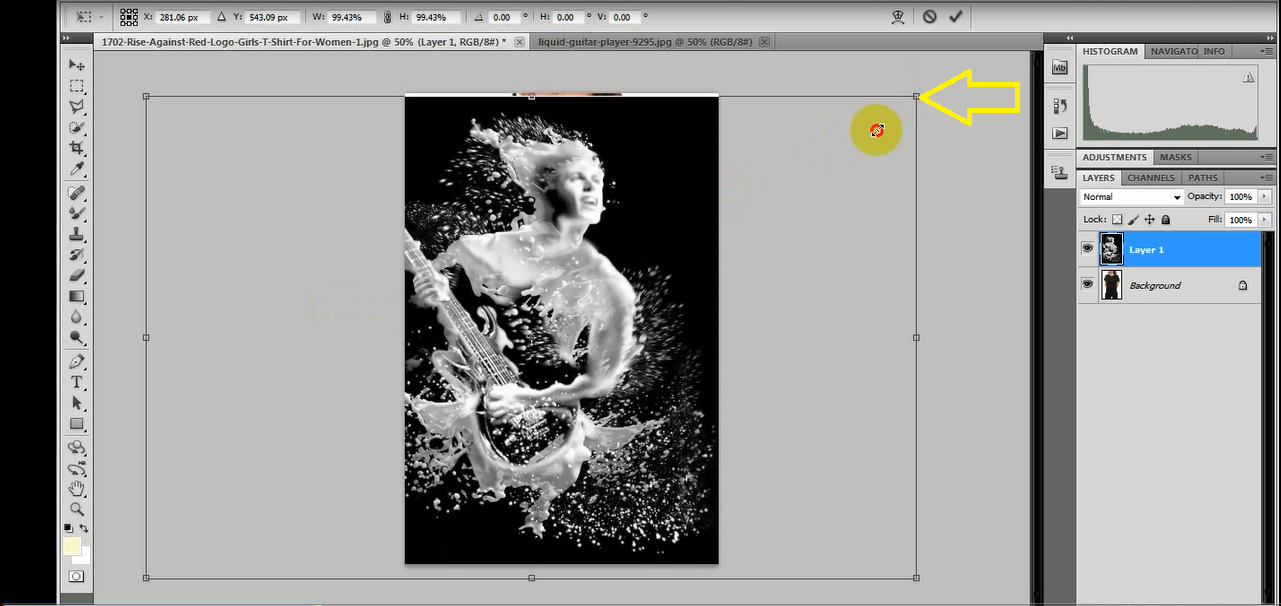
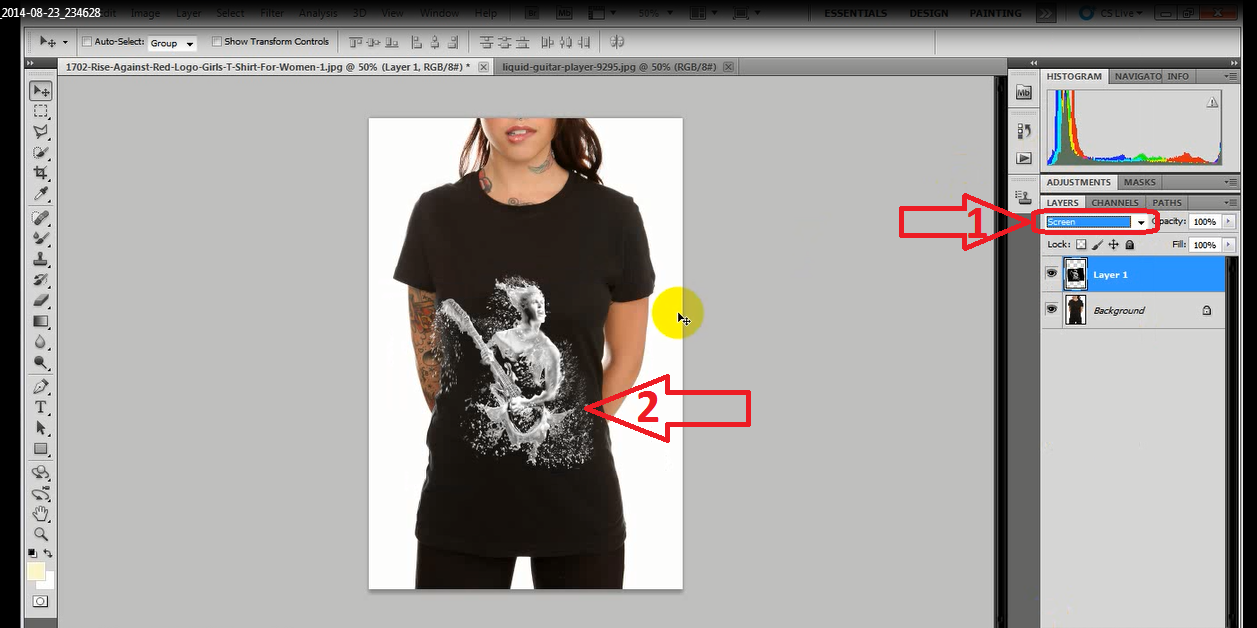
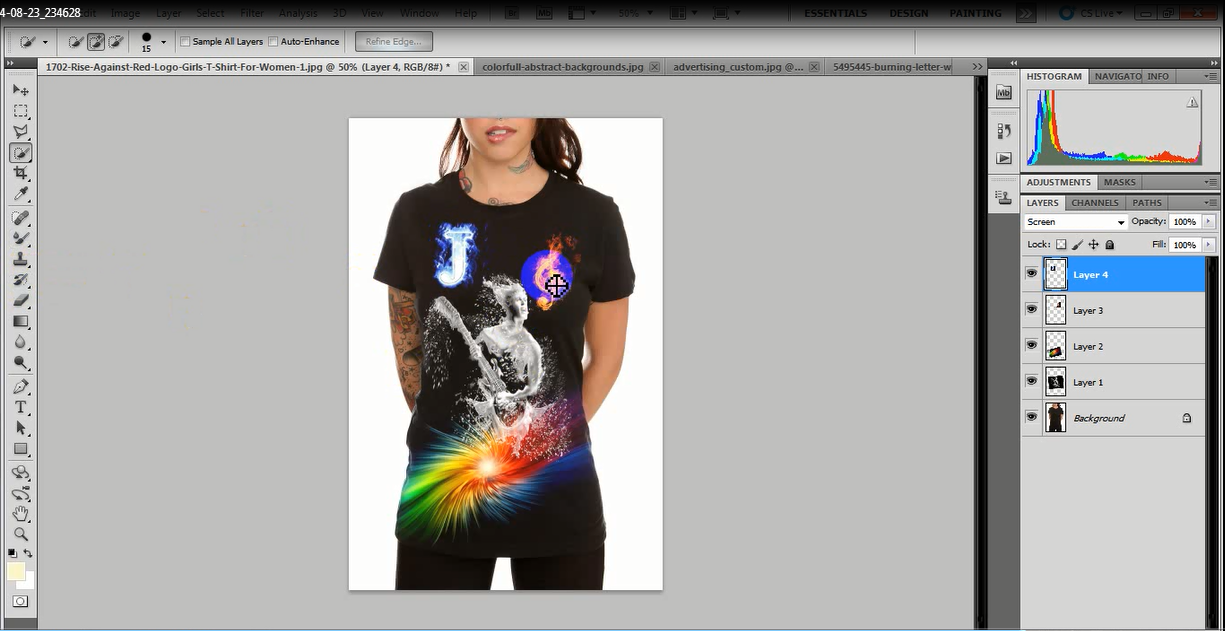
(၃)ေအာက္ကပထမ အပံုေလးလိုေပၚေနမွာပါ အပံုကို ကိုယ္လိုခ်င္သေလာက္ေသးဖို႔ ကီးဘုပ္ေပၚက ctrl+t ေလးနိုပ္ေပးလိုက္ရင္ ေလးေထာင့္ေလးေပၚလာမွာပါ တစ္ကယ္၍ ေသးရင္ဆိုက္မျပတ္ေအာင္ ေထာင့္တစ္ေနရာကေန ေမာက္ေထာက္ျပီး ကီးဘုပ္ေပၚက shift ကိုပါ နိုပ္ျပီးေသးလိုက္ပါ ပံု(၂) နည္းနည္းရွင္းျပမယ္ေနာ္ ကိုယ္္ထည့္မယ့္အပံုေနာက္ခံ အေရာင္ကအနတ္ေရာင္ဆို ကၽြန္ေတာ္ျပထားသလိုလုပ္လိုက္ရံုနဲ႔ရပါတယ္ တကယ္၍မ်ား ေနာက္ခံပံုက တျခားအေရာင္ျဖစ္ေနရင္ေတာ့ တက္တက္ျဖတ္ယူရမွာပါ ျဖတ္နည္းေလးကိုေတာ့ေနာက္ သင္ခန္းစာမွာျပေပးသြားပါ့မယ္ ခုဆက္ရေအာင္ အပံုကိုလိုခ်င္သေလာက္ရရင္ေတာ့ Enter လုပ္လိုက္ပါ ok ျပီးရင္ (၂) ပံုမွာ (၁)မ်ွားျပထားတဲ့ေနရာေလးမွာ screen ေျပာင္းေပးလိုက္ရင္ဘဲ ေအာ္တို ေနာက္ခံေရာင္ေျပာက္သြားမွာပါ ေျပာက္သြားရင္ေတာ့ ကိုယ္လိုခ်င္တဲ့ေနရာမွာ လိုသလို ခ်ိန္ျပီးထားနိုင္ပါျပီေနာ္
(၄)ေအာက္ကအပံုေတြကေတာ့ ကိုယ္ထပ္ထည့္ခ်င္တဲ့ အပံုကို အေပၚကေျပာခဲ့သလိုဘဲ လုပ္ေဆာင္ရံုပါဘဲ (၂)ပံုကကၽြန္ေတာ္လုပ္ျပီးပံုေလးေပ့ါ ဒီဇိုင္းေလးေတြန႔ဲ vdo / pdf စာအုပ္ေတြကိုတင္ေပးထားပါတယ္ လြယ္ကူစြာေဒါင္းနိုင္ပါတယ္
key rar = hlakooo
လိုအားေပးတဲ့အတြက္ အထူးေက်းဇဴးတင္ပါေၾကာင္း ေျပာၾကားပါရေစ..photoshow worlsdမွ  နည္းပညာမ်ားအား မည္သူမဆို လြတ္လပ္စြာ ကူးယူသုံးစြဲနိဳင္ပါတယ္.က်ြန္ေတာ္တင္သမွ်ပိုစ့္ေတြ Facebook ကေနရယူခ်င္တယ္ဆိုရင္ ဒီမွာ Like ႏွိပ္ပါ။ မန္ဘာ၀င္ခဲ့ျခင္းျဖင့္ ပိုစ့္အသစ္တင္တိုင္း မိမိ Gmail ထဲကိုတိုက္ရိုက္ေရာက္ရွိမည္ျဖစ္ပါသည္။
ထို႔ေၾကာင့္မန္ဘာ၀င္ခဲ့ဖို႔ဖိတ္ေခၚပါတယ္။
တင္ထားသမွ် ေခါင္းစဥ္မ်ား

2Step Verification (5) A+အေၾကာင္း (1) Activator (9) Adobe CS3 Master Collection (1) Adobe Premiere Pro CS6 အသံုးျပဳနည္ (1) Adobe Software (12) Android application (1987) Android Game (709) AndroidPhoneဆိုင္ရာ (4) Antivirus (1) Apowersoft ApowerEdit v1.4.7.22 Build 04042019 (1) AVAST! Cleanup Premium 2019 version 19.1 Build 7085 (1) Blog Slider (8) Blogger Button (5) Blogger Comment (17) Blogger Ebooks (1) Blogger Hack (54) Blogger Loading Style (6) Blogger Mouse (1) Blogger Template (44) Blogger Tips (77) Blogger Widget (152) Blogs Html (63) Blogs Post (86) Blogs Tab Menu (53) Blogဆိုင္ရာ (1) Bowser ဆိုင္ရာ (21) Brothers in Arms® 3 v1.4.7c Mod Data [Unlimited Money] (1) Buddha ျမန္မာစာတန္းထုိး (53) Burning Software (34) Burning Tools (47) C-Box (10) Canon LBP 6000 Original Driver (1) Canon LBP 6030 Original Driver & Installation Guide (1) CCleaner 5.56.7144 (Business / Professional / Technician) Multilingual Portable (1) CD/DVD ဆိုင္ရာမ်ား (30) Cleanner-Speed (68) Computer Autoplay ပိတ္ထားနည္း (1) Computer Partationခြဲနည္း (1) Computer ဆိုင္ရာ (189) Computerဆိုင္ရာ (33) Converter (73) Desing Card (10) Display အလုပ္မလုပ္ေသာ ျပႆနာေျဖရွင္းနညး္မ်ား (1) Domain (3) Download Manager (42) Drive SnapShot v1.46.0.18213 (1) Driver Software (46) DVD-Cloner Platinum 2019 v16.30 Build 1446 [x86/x64] (1) DVDFab v11.0.2.4 [x86/x64] (1) Easy Translator version 14.0.0 (1) Ebooks (405) Errorေျဖ႐ွင္းနည္း (1) Eset Smart Security 12.1.34.0 (x86/x64) (1) Facebook (152) Folder Lock (17) Fonts မ်ားစုစည္းမႈ (6) Foxit PhantomPDF (1) Game (47) Game PC (32) Glary Utilities PRO version 5.117.0.142 (1) Gmail-Gtalk (70) GoogleChome &InternetDownloadmananger (1) Hacking (81) How To Download (6) Html (51) Internet Download Manager (18) InternetDownloadmananger(IDM) (1) IP Hider Software (6) Java Script (11) KhineMaster (1) KMS/2038 & Digital & Online Activation Suite v6.9 (1) MAGIX SOUND FORGE Pro 13 v.13.0.0 Build 46 (1) Marquee Technique (14) Media Player (31) MI Play store Apk (1) Microsoft Office (21) Mobile Legends Bang Bang Installer .exe Pc Version (1) Motors ( ေမာ္တာမ်ား )အေၾကာင္း (1) Movie (95) My Pdf (35) Myanmar Font (9) Myanmar Typing Software (1) MZW Solftware (1) NetGuide Journal (63) Network Software (7) New Blogs (15) Notကာကြယ္ျခင္းနည္း (1) ONEKEY PDF Convert to Word 4.0 REPACK (1) Partition Software (7) Password Recovery Software (1) paypal နွင္ ့ဆိုင္ေသာ (5) PC GAMES (17) PC recovery (13) PC Software (203) PC Speed Up (32) PC-Clean Software (73) PDF (4) PDF Editor (10) Photo Editor Software (64) PHOTO SHOP (သင္တန္း)သီးသန္႔ (44) Photo Slideshow (12) photoshop background အလန္းမ်ား (6) photoshop PNG ဖိုင္မ်ားရွာရန္ (14) Photoshop Software (35) Photoshop ဆိ္ုင္ရာ (51) Player (8) PrinterDriver (2) Programming (16) Pyidaungsu font (1) Read More (9) Recent Posts Widget (23) Recover Software (46) Recovery (33) Refresh and Restoreအေၾကာင္း (1) Reset (1) SAMSUNG One UI ဖုန္းေတြအတြက္ ျမန္မာေဖာင့္ (1) Screen Video Recorder (37) Search Box (6) Security Software (36) Sidebar Widget (71) SkyNet လိုင္းအသစ္ထည့္နည္း (1) SkynetBinfile (1) Slideshow Movie Maker (7) Social Widget (19) SOFTWARE (588) Software For Blogs (17) Software မ်ားအသံုးျပဳနည္း (2) Softwares ေတြအတြက္ Serial no (or) Key ေတာင္းလၽွင္ ေျဖ႐ွင္းနည္း (1) Speed Up Internet (13) TeamViewer version 14.2.2558.0 (Repack & Portable) (1) TTA Pie Myanmar (1) Unicode ေ​ြေပာင်းနည်း (1) Uninstaller Software (25) Upload (6) USB ျဖင့္၀င္းဒိုးတင္နည္း (4) USB ႀကိဳးကေန Virus မဝင္ေအာင္ ႀကိဳတင္ ကာကြယ္နည္း (1) Usb-Memory (19) Video Converter (29) Video Editing (76) Video Editor (1) Video Recorder (12) Virus ဆိုင္ရာ (86) WannaCry Ransomware ၏ အႏၱရာယ္ အေၾကာင္းႏွင့္ ကာကြယ္နည္း (1) Web Design ေရးဆြဲနည္း (5) Webcam Camera Software (11) Website ေရးနည္း (3) Wifi ဆိုင္ရာ (32) Win Update v1.4 (1) Window-10 ဆိုင္ရာ (2) Window-7 ဆိုင္ရာ (32) Window-xp ဆုိင္ရာ (2) window8ဆိုင္ရာ (19) Windows 10 Factory Reset ခ်နည္း (1) Windows 10 Backup & Restore လုုပ္နည္း (1) Windows 10 ကြန္ပ်ဴတာမွာျမန္မာစာတိက်မွန္စြာထည့္နည္း (1) Windows Activator (18) windows loader မ်ား (10) Windows Manager Software (23) Windows Themes (24) Windows တင္နည္းမ်ား (6) WinRAR 5.70 (Fully) (1) WinRar Full Version (12) WinRAR V3.80 Beta Version (1) WinToBootic ႏွင့္ USB ထဲ Install လုပ္နည္း (7) WinUtilities Professional Edition Tool (1) Wordpress Tips (3) Write-Protected ကို ျဖဳတ္ႏိုင္မယ့္နည္းႏွစ္သြယ္ (1) Zawgyi နဲ႔ Unocode ဘာကြာလဲ (1) ကြန္ပ်ဴတာ User Account Picture အေၾကာင္းမ်ား (1) ကြန္ပ်ဴတာဆိုင္ရာ (1) ကြန္ပ်ဴတာပတ္၀ပ္ေျပာင္းမရေအာင္လုပ္နည္း (1) ကြန္ပ်ဴတာရဲ ့Storage က HDD လား? SSD လား? စစ္ေဆးနည္းမ်ား (1) ကြန္ပ်ဴတာဟန္းေနရင္ေျဖ႐ွင္းနည္း (1) ကြ်နုပ္ႏွင့္ ပရဟိတအလွဴ (9) ကာမသိဒၶိက်မ္း (1) ခ်က္နည္းျပဳတ္နည္း (1) နည္းပညာဆိုင္ရာ (2) နည္းလမ္းမ်ား (6) ပန္ကာျပဳျပင္နည္း (1) ဖိုင္ေျဖနည္းမ်ား (8) ဗဟုသုတ (6) ဗားရွင္းအသစ္ထြက္ရွိလာတဲ႔ Facebook (ႏွင္႔) Messenger (1) ဘာသာစကား ၉၁ မ်ိုးထိ ပါ၀င္တဲ့ Easy Translator (1) ဘာသာေရးစာအုပ္မ်ား (9) မိမိဆိုက္ကိုေကာ္ပီကူးမရေအာင္ ပိတ္ထားနည္း (1) ျပည္ေထာင္စု ေဖာင့္ လက္ကြက္ ႏွင့္ စာ႐ိုက္နည္း (1) ျမန္မာစာမွန္ေအာင္လုပ္နည္း (1) ျမန္မာဆိုတာ (1) ဝင္းဒုိးကုိ AOMEISoftware ျဖင္႔ Backup & Restore လုပ္နည္း (1) သင့္ Laptop ကို ျမန္ဆန္ေအာင္လုပ္ေပးမယ့္ အခ်က္ ၇ ခ်က (1) အင္တာဗ်ဴးအစီစဥ္ (2) အပ်ိဳလမ္းၫႊန္ (1) အသံဇာတ္လမ္း (19) အေျခခံကြန္ပ်ဴတာ Pdf (1) ဦးဇာနည္နည္းလမ္းမ်ား (7) ေဆာ့ဝဲ ျပႆနာေျဖ႐ွင္းနည္း (1) ေၾကာ္ျငာ (13) ေဟာေျပာပြဲ (15)

မန္ဘာ၀င္လို႕အားေပးၾကပါ